CWL and Shell Tools
Overview
Teaching: 0 min
Exercises: 0 minQuestions
What is the difference between a CWL tool description and a CWL workflow?
How can we create a tool descriptor?
How can we use this in a single step workflow?
Objectives
describe the relationship between a tool and its corresponding CWL document
exercise good practices when naming inputs and outputs
understand how to reference files for input and output
explain that only files explicitly mentioned in a description will be included in the output of a step/workflow
implement bulk capturing of all files produced by a step/workflow for debugging purposes
use STDIN and STDOUT as input and output
capture output written to a specific directory, the working directory, or the same directory where input is located
learning objectives
By the end of this episode, learners should be able to explain how a workflow document describes the input and output of a workflow and the flow of data between tools and describe all the requirements for running a tool and define the files that will be included as output of a workflow.
CWL workflows are defined in a YAML script, containing the workflow and the requirements for running that workflow. All CWL scripts should start with two lines of code:
cwlVersion: v1.2
class:
The cwlVersion string defines which standard of the language is required for the tool or workflow. The most recent version is v1.2, and defaulting to this will enable your scripts to use all versions of the language, though some workflow engines which are not up-to-date may not run the script. This is, however, a hurdle to be tackled when you reach it.
The class field defines what this particular script is. The majority of CWL scripts will fall into one of two classes: CommandLineTool, or Workflow. The former class is used for describing the interface for a command-line tool, while the latter class is used for collecting those tool descriptions into a workflow. In this lesson we will learn the differences between these two classes, how to pass data to and from command-line tools and specify working environments for these, and finally how to use a tool descriptor within a workflow.
Tool Descriptors
To demonstrate the basic requirements for a tool descriptor we will recreate the standard hello world example. Note: replace this with a domain specific (but similar complexity) example! This is the shell echo command that we will use:
$ echo 'hello World!'
hello World!
Create a file, echo.cwl, to contain your CWL example for this:
cwlVersion: v1.2
class: CommandLineTool

baseCommand: [echo, 'hello World!']
We present baseCommand as a two item list containing the command and the input string. CWL will combine these two items (in the order given) to make the full command when the script is run. This is not a complete tool descriptor yet, however - to find out what is missing we can use cwltool to validate the script:
$ cwltool --validate echo.cwl
INFO .../cwltool

INFO Resolved 'echo.cwl' to 'file:///.../echo.cwl'
ERROR Tool definition failed validation:
echo.cwl:1:1: "outputs" section is not valid.
cwltool has noted that we are missing an outputs section, so we will add this to our script:
cwlVersion: v1.2
class: CommandLineTool

baseCommand: [echo, 'hello World!']
outputs: []
note that we are using an empty list [] here, as we do not want to capture any output for the moment. We will now validate the script again:
$ cwltool --validate echo.cwl
INFO .../cwltool

INFO Resolved 'echo.cwl' to 'file:///.../echo.cwl'
ERROR Tool definition failed validation:
echo.cwl:1:1: Object `echo.cwl` is not valid because
                        tried `CommandLineTool` but
                          missing required field `inputs`
cwltool has noted that we are missing an inputs field, so we will add this also to our script (again as an empty list):
cwlVersion: v1.2
class: CommandLineTool

baseCommand: [echo, 'hello World!']
inputs: []
outputs: []
We will now validate the script again:
$ cwltool --validate echo.cwl
INFO .../cwltool
INFO Resolved 'echo.cwl' to 'file:///.../echo.cwl'
echo.cwl is valid CWL.
Finally we have a valid CWL tool descriptor, so we will run this using cwltool:
cwltool echo.cwl
INFO .../cwltool
INFO Resolved 'echo.cwl' to 'file:///.../echo.cwl'
INFO [job echo.cwl] /private/tmp/docker_tmpwvj2kdvw$ echo \
    'hello World!'
hello World!
INFO [job echo.cwl] completed success
{}
INFO Final process status is success
Our script has been run successfully! Note: add graphic here that identifies what each part of the returned information is (for example, what is CWL information, what is the command run, what is STDOUT, and what is the (currently empty) returned information
Location, Location, Location
Note the string after
INFO [job echo.cwl]shows the location/private/tmp/docker_tmpwvj2kdvwin our example, but will show a different randomly named, and temporary, directory when you run this example. CWL will always create a separate, temporary, working directory for running each tool instance. This ensures that the run-time environment for each tool instance is well controlled, and does not contain anything left behind by another tool.
Script order
To make our script more readable we have put the
inputfield in front of theoutputfield. However CWL syntax requires only that each field is properly defined, it does not require them to be in a particular order. Try changing around the order of fields in our example script, and run the validation step on these to make sure this is true.
So far our script is rather limited, with no inputs specified, and the string that we are printing out has been merged into the baseCommand. We will now split out the input string, so that we can make this tool more flexible.
We remove the hello World! string from the baseCommand (where it should not have been in the first place…), and create an inputs item which we will call message_text:
cwlVersion: v1.2
class: CommandLineTool

baseCommand: echo
inputs:
  message_text:
    type: string
    default: 'hello World!'
    inputBinding:
      position: 1

outputs: []
We set the type of message_text to string, and set the inputBinding position (defining where the input item appears after the baseCommand) as 1. We also give a default value, hello World!, for this item, which will be used if the item is not defined within an input file.
We can now validate, and then run, this tool again:
$ cwltool --validate echo.cwl
INFO .../cwltool
INFO Resolved 'echo.cwl' to 'file:///.../echo.cwl'
echo.cwl is valid CWL.
$ cwltool echo.cwl
INFO .../cwltool
INFO Resolved 'echo.cwl' to 'file:///.../echo.cwl'
INFO [job echo.cwl] /private/tmp/docker_tmprm65mucw$ echo \
    'hello World!'
hello World!
INFO [job echo.cwl] completed success
{}
INFO Final process status is success
The script is now ready to accept an input from us. This we will put in another YAML file (moon.yml):
message_text: 'hello Moon!'
And then run:
$ cwltool echo.cwl moon.yml
INFO .../cwltool
INFO Resolved 'echo.cwl' to 'file:///.../echo.cwl'
INFO [job echo.cwl] /private/tmp/docker_tmpu7z20wc7$ echo \
    'hello Moon!'
hello Moon!
INFO [job echo.cwl] completed success
{}
INFO Final process status is success
Note that we have not yet captured the output from the command. We can do this by adding an outputs item to the script:
cwlVersion: v1.2
class: CommandLineTool

baseCommand: echo
inputs:
  message_text:
    type: string
    default: 'hello World!'
    inputBinding:
      position: 1

outputs:
  message_out:
    type: stdout
Here we have added the message_out item, which has been given type stdout (as we want to capture the output at the command line, rather than any particular files).
Now we run the script:
$ cwltool echo.cwl moon.yml
INFO .../cwltool
INFO Resolved 'echo.cwl' to 'file:///.../echo.cwl'
INFO [job echo.cwl] /private/tmp/docker_tmp7k0bqeg5$ echo \
    'hello Moon!' > /private/tmp/docker_tmp7k0bqeg5/9611f21693018fe4ce4bf1f3884e47dae2ce3aab
INFO [job echo.cwl] completed success
{
    "message_out": {
        "location": "file:///.../9611f21693018fe4ce4bf1f3884e47dae2ce3aab",
        "basename": "9611f21693018fe4ce4bf1f3884e47dae2ce3aab",
        "class": "File",
        "checksum": "sha1$d4413a97a36059e8855168ac7939a4cb5d4da9c9",
        "size": 12,
        "path": "/.../9611f21693018fe4ce4bf1f3884e47dae2ce3aab"
    }
}
INFO Final process status is success
Note that the output has been saved as a file called 9611f21693018fe4ce4bf1f3884e47dae2ce3aab (not message_out, which is only the output variable name) in this instance. When you run this script the file name will be different. You can open this text file with a text editor to confirm that it contains the expected message.
It is not very user-friendly to have our script return a randomly named file each time, so we will make use of the stdout field to specify the name of the text file that we want standard output to be captured to:
cwlVersion: v1.2
class: CommandLineTool

baseCommand: echo
inputs:
  message_text:
    type: string
    default: 'hello World!'
    inputBinding:
      position: 1

stdout: output.txt

outputs:
  message_out:
    type: stdout
Running the script will produce this output:
$ cwltool echo.cwl moon.yml
INFO /.../cwltool
INFO Resolved 'echo.cwl' to 'file:///.../echo.cwl'
INFO [job echo.cwl] /private/tmp/docker_tmp5iazb06g$ echo \
    'hello Moon!' > /private/tmp/docker_tmp5iazb06g/output.txt
INFO [job echo.cwl] completed success
{
    "message_out": {
        "location": "file:///.../output.txt",
        "basename": "output.txt",
        "class": "File",
        "checksum": "sha1$d4413a97a36059e8855168ac7939a4cb5d4da9c9",
        "size": 12,
        "path": "/.../output.txt"
    }
}
INFO Final process status is success
Note now that the file returned is called output.txt, but it has the same contents as the previous, randomly named, file.
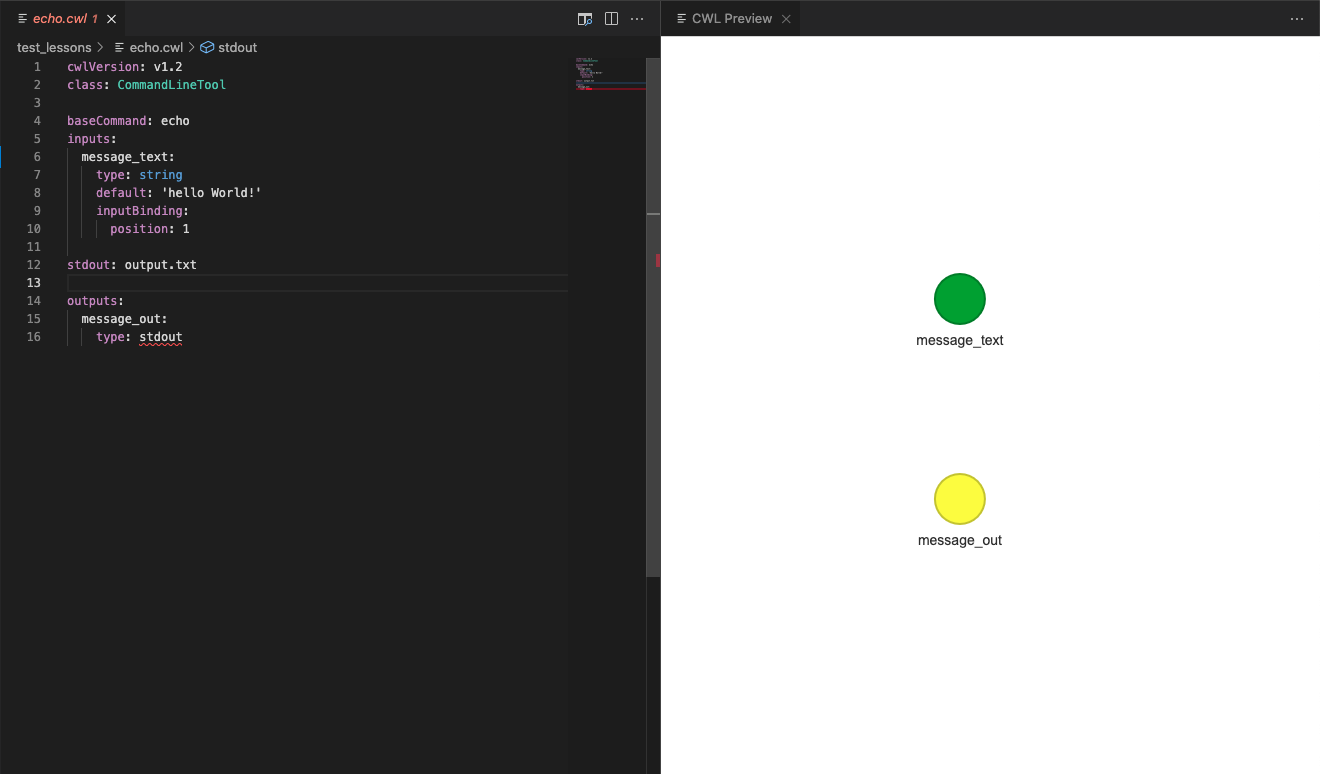
We will now make use of the VSCode/Benten tool to illustrate the tool descriptor. Please press the CWL Viewer button at the top-left of the VSCode window:
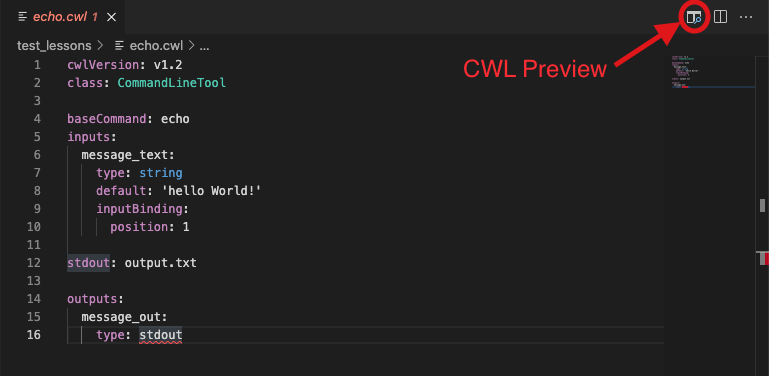
You will now be able to see a sketch of the tool descriptor. This will show the input (in green) and output (in yellow) items for this tool descriptor. This is not very helpful information at the moment, but leave this window open as we move onto writing our first workflow.
Creating tool descriptor for your tool
Add here a challenge for creating a tool descriptor for another tool? Perhaps make the input a file and a text string, and introduce
prefix: ...to theinputBindinginterface (as well as giving more positions than just 1)?
CWL single step workflow
Now that we have created a tool descriptor we can use it in our workflow. We will start with a single step workflow, to illustrate how workflows and tool descriptors interact.
Create a file workflow_example.cwl, containing these lines:
cwlVersion: v1.2
class: Workflow

inputs: []

outputs: []
Workflows use inputs and outputs fields, just as the tool descriptors do, but they don’t use baseCommand. Run the validation tool to find out what is missing:
$ cwltool --validate workflow_example.cwl
INFO /.../cwltool
INFO Resolved 'workflow_example.cwl' to 'file:///.../workflow_example.cwl'
ERROR Tool definition failed validation:
workflow_example.cwl:1:1: Object `workflow_example.cwl` is not valid because
                            tried `Workflow` but
                              missing required field `steps`
Workflows need a steps field, in which are listed the workflow tasks or steps that are to be run. In this instance we wish only to run the echo.cwl tool that we wrote above, so we will add one step to this workflow. This step will require us to specify what tool we will run, as well as providing lists of in and out items for the tool. To begin with we will provide the bare minimum to make this workflow run:
cwlVersion: v1.2
class: Workflow

inputs: []

outputs: []

steps:
  01_echo:
    run: echo.cwl
    in: []
    out: []
And then we run the script:
$ cwltool workflow_example.cwl
INFO /.../cwltool
INFO Resolved 'workflow_example.cwl' to 'file:///.../workflow_example.cwl'
INFO [workflow ] start
INFO [workflow ] starting step 01_echo
INFO [step 01_echo] start
INFO [job 01_echo] /private/tmp/docker_tmpx4889wo6$ echo \
    'hello World!' > /private/tmp/docker_tmpx4889wo6/output.txt
INFO [job 01_echo] completed success
INFO [step 01_echo] completed success
INFO [workflow ] completed success
{}
INFO Final process status is success
This was a success, but the workflow has not returned any files this time, and the echo’d message is the default ‘hello World!’ message. Now we must connect our tool inputs and outputs up in the workflow.
First we will specify the flow of inputs for our workflow, taking them from the YAML configuration file, and passing them through to the echo tool:
cwlVersion: v1.2
class: Workflow

inputs:
  message_text: string

outputs: []

steps:
  01_echo:
    run: echo.cwl
    in:
      message_text: message_text
    out: []
The inputs entry is similar to that for the echo.cwl tool (as we are going to read the same input file), but we have not given a default value or input binding. Within the in list we explicitly link the tool’s message_text field with our workflow’s message_text field. These do not need to have matching names, in the next episode we will show how these can change as you start linking steps together.
Now run this workflow:
$ cwltool workflow_example.cwl moon.yml
INFO /.../cwltool
INFO Resolved 'workflow_example.cwl' to 'file:///.../workflow_example.cwl'
INFO [workflow ] start
INFO [workflow ] starting step 01_echo
INFO [step 01_echo] start
INFO [job 01_echo] /private/tmp/docker_tmpd9ghguo8$ echo \
    'hello Moon!' > /private/tmp/docker_tmpd9ghguo8/output.txt
INFO [job 01_echo] completed success
INFO [step 01_echo] completed success
INFO [workflow ] completed success
{}
INFO Final process status is success
We can see that the echo’d text has changed. But still no files are being returned from our tool, so we need to explicitly list the files that we want the workflow to return.
cwlVersion: v1.2
class: Workflow

inputs:
  message_text: string

outputs:
  message_file:
    type: File
    outputSource: 01_echo/message_out

steps:
  01_echo:
    run: echo.cwl
    in:
      message_text: message_text
    out: [message_out]
The outputs entry is again similar to that for the echo.cwl tool. However we are using the File type, as that is what the tool descriptor returns, and specifying an outputSource, which makes clear the link to step 01_echo and the message_out object. For the out field of our workflow step we simply provide a list of the objects we require outputting.
Now we can run this workflow, to provide the same output as running the tool descriptor did:
$ cwltool workflow_example.cwl moon.yml
INFO /.../cwltool
INFO Resolved 'workflow_example.cwl' to 'file:///.../workflow_example.cwl'
INFO [workflow ] start
INFO [workflow ] starting step 01_echo
INFO [step 01_echo] start
INFO [job 01_echo] /private/tmp/docker_tmpvkqoq0n3$ echo \
    'hello Moon!' > /private/tmp/docker_tmpvkqoq0n3/output.txt
INFO [job 01_echo] completed success
INFO [step 01_echo] completed success
INFO [workflow ] completed success
{
    "message_file": {
        "location": "file:///.../output.txt",
        "basename": "output.txt",
        "class": "File",
        "checksum": "sha1$d4413a97a36059e8855168ac7939a4cb5d4da9c9",
        "size": 12,
        "path": "/.../output.txt"
    }
}
INFO Final process status is success
In the CWL Preview window of the VSCode editor we will now be able to see the input and outputs that were there for the tool descriptor, but these will now be connected by the step of our workflow, illustrating their connection.
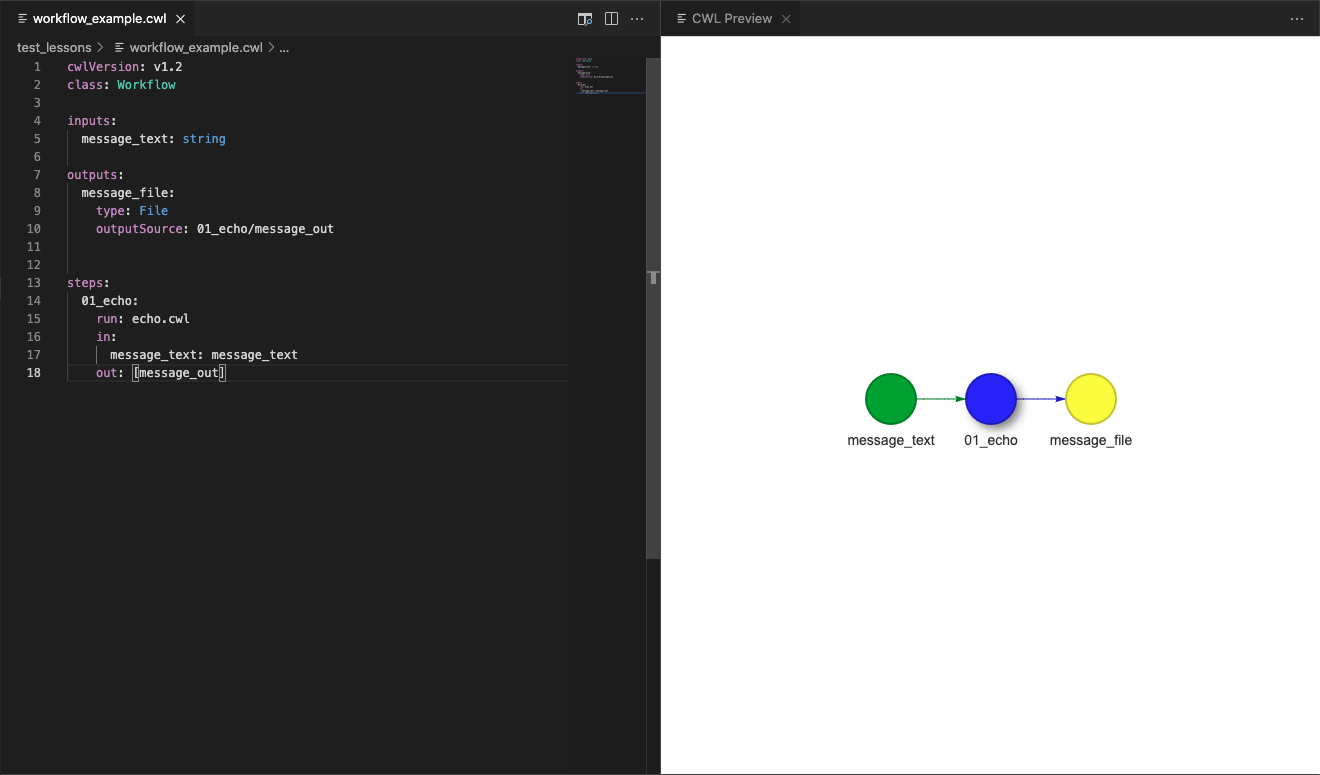
This connection is quite basic here, but in the next episode we will make use of this feature of VSCode/Benten to plan more complicated workflows.
Example Exercises
Use https://github.com/bcosc/fast_genome_variants/blob/main/README.md to create a CommandLineTool
Exercise 1
Create the baseCommand for running the joint_haplotype caller using the fast_genome_variants README.
Solution
The base command should use the path to the binary and the type of variants you’re calling.
baseCommand: [fgv, joint_haplotype]
Exercise 2:
When working in a cloud environment, you need to specify what machine type you would like to run on. Which means the job has to have specific parameters describing the RAM, Cores and Disk space (for both temporary and output files) it requires.
Create the
ResourceRequirementsfield for running 2 BAMs for thefgv joint_haplotypecommand.Solution:
requirements:
  ResourceRequirement:
    ramMin: 4000
    coresMin: 2
FGV requires 2 GiB of memory for each bam input, and the unit for
ramMinis in MiB, so we need approximately 4000 MiB to meet the requirement. FGV also requires 1 core for each BAM, so here we ask for at least 2 cores.
Exercise 3:
- Create the
inputfield for runningfgv_joint_haplotype- Add an optional flag for calling a GVCF output
- Add a string input for intervals
chr2:1-10000- Add an output name.
Solution:
inputs:
  bam:
    type: File[]
    inputBinding:
      position: 1
      prefix: -bam
    secondaryFiles:
      - .bai
  gvcf:
    type: boolean
    inputBinding:
      position: 2
      prefix: -gvcf
  interval:
    type: string
    inputBinding:
      position: 3
  output_name:
    type: string
    inputBinding:
      position: 4
      prefix: -o
Exercise 4:
Create the output variable for the CommandLineTool and name it output_vcf.
Solution:
outputs:
  output_vcf:
    type: File
    outputBinding:
      glob: $(inputs.output_name)
Exercise 5:
TODO
Solution:
Capturing Output
Exercise 1
Using this
CommandLineTooldescription, what files would be the output of the tool?cwlVersion: v1.0 class: CommandLineTool baseCommand: [bwa, mem] inputs: reference: type: File inputBinding: position: 1 fastq_reads: type: File[] inputBinding: position: 2 stdout: output.sam outputs: output: type: File outputBinding: glob: output.samSolution
output.samwill be the only file outputted. Only files explicitly stated in the outputs field will be included in the output of the step.
Exercise 2
Your colleague tells you to run
fastqc, which creates several files describing the quality of the data. For now, let’s assume the tool creates three files:
final_report_fastqc.htmlfinal_figures_fastqc.zipsupplemental_figures_fastqc.htmlCreate a CWL
outputsfield using aFilearray that captures all the fastqc files in a single output variable.Solution
outputs:
  output:
    type: File[]
    outputBinding:
      glob: "*fastqc*"
Actually,
fastqcmay create more than 3 of these files, depending on the input parameters you give it, it may create aresultsdirectory that contains additional files such asresults/fastqc_per_base_content.htmlandresults/fastqc_per_base_gc_content.html.Create a CWL
outputsfield that captures theresults/fastqc_per_base_content.htmlandresults/fastqc_per_base_gc_content.htmlin separate output variables.Solution
outputs:
  per_base_content:
    type: File
    outputBinding:
      glob: "results/fastqc_per_base_content.html"
  per_base_gc_content:
    type: File
    outputBinding:
      glob: "results/fastqc_per_base_gc_content.html"
Finally, instead of explicitly defining each file to be captured, create a CWL
outputsfield that captures the entireresultsdirectory.Solution
outputs:
  results:
    type: Directory
    outputBinding:
      glob: "results"
Exercise 3
Since
fastqccan be unpredictable in its outputs and file naming, create a CWL outputs field using aDirectorythat captures all the files in a single output variable.Solution
outputs:
  output:
    type: Directory
    outputBinding:
      glob: .
Exercise 4
Your colleague says that he is running
samtools indexin CWL, but the index is not being outputted. Fix the following CWL to have output the index along with thebamas asecondaryFile.cwlVersion: v1.0 class: CommandLineTool requirements: InitialWorkDirRequirement: listing: - $(inputs.bam) baseCommand: [samtools, index] inputs: bam: type: File inputBinding: position: 1 valueFrom: $(self.basename) outputs: output_bam_and_index: type: File outputBinding: glob: $(inputs.bam.basename)Solution
cwlVersion: v1.0
class: CommandLineTool

requirements:
  InitialWorkDirRequirement:
    listing:
      - $(inputs.bam)

baseCommand: [samtools, index]

inputs:
  bam:
    type: File
    inputBinding:
      position: 1
      valueFrom: $(self.basename)

outputs:
  output_bam_and_index:
    type: File
    secondaryFiles:
      - .bai
    outputBinding:
      glob: $(inputs.bam.basename)
Exercise 5
What if
InitialWorkDirRequirementwas not used, and the index file was created where the input bam was located? How would you capture the output? Create theoutputsfield using the same CWL in exercise 4.Solution
outputs:
  output_bam_and_index:
    type: File
    secondaryFile:
      - .bai
    outputBinding:
      glob: $(inputs.bam)
Key Points
First key point. Brief Answer to questions. (FIXME)